Mpressive Threadz Studio Blog

Sharing my love of sewing


1 Comment

New Year and New Laughs

Each year brings ups and downs, joy and pain.  2013 was no different.

I did not do a lot of writing to this blog in 2013.  It was a year full of changes.  I went back to school to pursue my degree, I received a promotion on my job, and every few weeks I found myself on an airplane.  I started off 2013 with an empty nest and ended the year with a FULL house.

2014 will be a year in which I celebrate a semi-milestone birthday.  It will also be a year that will test the very core of who I am. Last night, my granddaughter asked what New Year resolution I had made.  I don’t usually make New Year resolutions.  However, I do resolve that in 2014 I will leverage my strengths and laugh so much more than I have ever laughed before.

One of the things I like to do is cook.  My husband and I are always on the prowl for great recipes.  I found a fantastic waffle recipe on Food52.com and I tweaked it for my family.  Since I had some fruit, I put it with a little of this and a little of that to make a fruit topping for the waffles.  Here is my version of waffles with wine poached fruit.  Enjoy!  And Happy New Year!

P.S.  First laugh of 2014.  My daughter did what college students usually do and slept VERY late today.  She missed out on the waffles.  LOL.

Waffles

 Makes approximately 6-7 waffles (6 1/2″ wide x 3/4″ thick)

Stir together and set aside:
2 cups whole milk
1 tablespoon apple cider vinegar

Combine in a medium bowl:
1 3/4 cup all-purpose flour
1/3 cup cornstarch
1 teaspoon baking powder
1/2 teaspoon baking soda
1/2 teaspoon sea salt
1/4 teaspoon cinnamon
1/8 teaspoon nutmeg

Beat into milk mixture:
1/3 cup vegetable oil
1/3 cup melted butter
2 eggs
1 1/2 tablespoons sugar
1 teaspoon vanilla extract or your favorite flavoring

  • Whisk milk mixture into flour mixture until clumps of flour are gone. Let batter sit for 30 minutes before making waffles.

  • Follow the directions for your waffle iron to cook the waffles.  If possible, serve immediately.  To keep warm, put in single layer on a perforated cooking sheet in a 170 degree oven.

Wine Poached Waffle Topping

4 apples or pears or combination of the two fruits
1/4 cup sweet red wine
1/4 cup white sugar
1/4 cup light brown sugar
4 tablespoons of butter
pinch of sea salt

  • Peel, core and cut fruit into 1” chunks.  Mix fruit and all the rest of the ingredient in a saucepan.  Cook over medium-low heat until fruit is soft.

  • Remove fruit from saucepan. Continue to cook liquid until reduced to a syrup.  Turn off heat.  Add fruit back to saucepan.  Stir fruit to coat with syrup.  Serve over waffles.


Leave a comment

Sewing Help Needed!

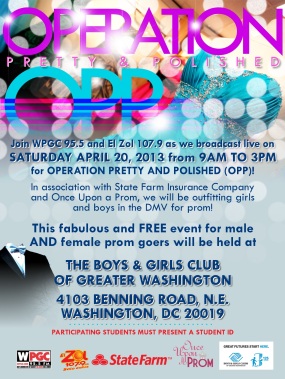
pretty and polishedOperation Pretty and Polished is an event that allows students to select free prom outfits. At the event, friends and I have altered some of the gowns for the girls and pants for the boys. I am reaching out to sewists in the Washington, DC area and asking if you can spare an hour or more and help with minor alterations at the event.

Beginning sewing skills are fine! The minor alterations are shortening the length of the gowns by machine, taking in side seams, and hemming pants. If you can mark a hem, please help. If you can take stitches out, please help. If you can stitch a simple seam and can bring a portable sewing machine, please help.

The Operation Pretty and Polished event is Saturday, April 20, 2013 from 9am – 3pm at the Boys and Girls Club of Greater Washington. Contact Julia Irving, the Community Outreach Coordinator Sixth District at the Metropolitan Police Department at 202-698-1315.

I want to be at the Operation Pretty and Polished event, but I can’t. A promotion at work gave me a new role, and the new role is keeping me from this year’s event. I plan to be there next year, but more help is needed this year.

Thanks in advance.

Sincerely, Doris


5 Comments

Work in Progress: Chartreuse and Taupe Ensemble – Part 1

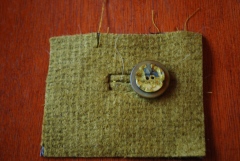
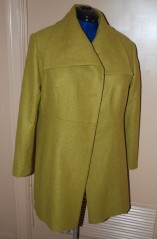
While I like making pieces, I love making an ensemble. When I made the jacket to coordinate with the chartreuse dress, I realized how much I missed creating an outfit. My first ensemble for 2013 is a coat, vest, slacks and blouse in the chartreuse and taupe color scheme.button

I’ve been working on the coat. The outer fabric is a chartreuse wool/mohair and the lining is rayon in a dark taupe color. I selected the buttons to coordinate with the brocade I am using for the vest. I splurged on everything as a treat to myself, purchasing the fabrics and buttons at Britex while I was in San Francisco in November for a business meeting.

B5685

B5685

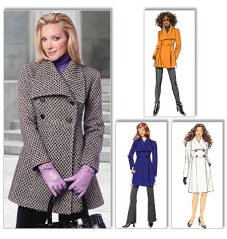
I am using Butterick 5685 with a few changes. I moved the pockets from the side seams to the front princess seams making it easier to reach into the pockets. I also deepened the pockets because I felt the pockets were too shallow and items may easily fall out. I didn’t want a double-breasted coat so I removed 2 ½” from the front edge of the coat including the collar edge. The sleeve is one piece with no ease for the elbow. Therefore, I lengthened only the back sleeve length ½” to allow for ease in the elbow area. I increased all hems to 2” because I think a generous hem hangs better.

For a fleeting moment I thought about not doing a muslin fitting for the coat. I quickly decided not doing a muslin would be a bad idea considering how much I paid for the fabric. I would rather have a wadder in cheap cotton than one in expensive wool. I selected the size using my upper bust measurement and used the D cup pattern piece. Based on the fitting, the shoulder fit fine. I don’t like to feel confined so I added ½” at each side seam allowance, adding 1” overall to the sleeve width (bicep and wrist) and 2” overall in the bust and waist areas. I shortened the sleeve length which was too long. I made a sway back adjustment by shortening the back bodice ½” at the center back.

chartreuse swatch

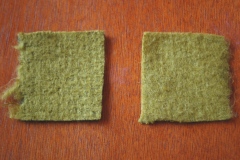
“wrong” side is the swatch on the left

I liked the “wrong” side of the fabric better because I thought the texture was more visually appealing for this ensemble. Before cutting out the coat pieces, I block-fused the wool fabric with weft interfacing to stabilize it. I also interlined the coat with cotton broadcloth for additional warmth. I made custom shoulder pads for the coat using the method I blogged about previously. I didn’t follow the sewing instructions for this pattern because of the collar construction Butterick used. Sewing the collar first and sandwiching it between the coat and facing would have created bulk. Also, Butterick sew the bodice and lining together, then the lower coat and lining together, then joined the bodice to the lower coat. Instead I stitched the coat attaching the under collar, stitched the lining and front facings together attaching the upper collar, and pressed the neck/collar seams open. Then I stitched the coat to the facing/lining. Two of the buttonholes are bound buttonholes and two of the buttonholes are in-seam buttonholes. The armscye seams are wrapped in fleece, creating a subtle roll in the sleeve caps.chartreuse coat

I have plenty of hand work ahead, finishing the buttonholes, tacking seams together, hemming the coat and sewing on buttons. Here’s a picture of the coat in its current state.


Leave a comment

The Family Tree Quilt

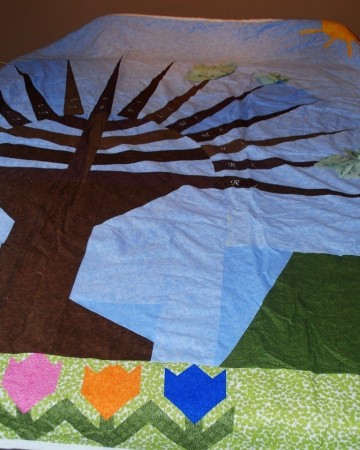
family tree quilt

Yesterday, I saw a posting by a cousin announcing the birth of his grandson.  He boasted about there now being four generations of men in his family that were alive.  That announcement made me think about the family tree quilt.

This year my mother’s side of the family had a family reunion.  I made a family tree quilt that was part of our opening night activities.  I started the quilt during a week I spent in South Carolina and it was a conversation starter.  Each branch of the tree is embroidered with the name of one of my great grandfather’s children.  Yes, there were 15 children so this tree has 15 branches! I tried to put the branches in birth order, but that posed a problem.  No one knew the birth order for two of the children who had died during their childhood.  All those who might know the birth order had passed away.  All that is known is that one had died falling off a wagon.  Although the branches are not in the proper order, the appearance of their names on this quilt signifies that they did exist.

At the reunion each member in attendance wrote their first name and birth year on a green piece of fabric.  The piece of fabric was then cut into a leaf shape and tacked on the quilt on the appropriate branch of the family.  It was an exciting activity!  Leaves were created for members who couldn’t attend.  Young teen cousins cut the precious green leaves.  My elderly aunts and other cousins helped me tack the leaves to the quilt.  My favorite moment was looking over and watching my first cousins with their nieces meticulously arrange their family leaves around my deceased aunt’s leaf and tack them on the branch belonging to my grandmother.

This quilt has triggered so many conversations, bringing forth so much family history in hilarious stories and sad stories.  I cut 200 scraps of fabric for the reunion and we ran out of leaves!  It was so important to those at the reunion to create leaves for their family members who couldn’t attend or who had passed away.  I will be having conversations over the next year with cousins to make sure to create a leave for each family member.  Some branches on the quilt will be bare.  One of my great aunts did not have any children of her own, but she helped to raise many nieces, nephews, and great nieces and great nephews.   We all adored her, so her bare branch does not represents emptiness because her life was filled with love.

My last remaining great aunt will be the keeper of the family tree quilt.  We have so many leaves to add to the quilt and I will take time to quilt the layers together.  Although I constructed the quilt by machine, I am thinking about actually doing the quilting by hand because that is the way my grandmother did it.  We have a family reunion every two years and the quilt will appear at each reunion so that new leaves for the babies born since the last reunion can be added.  A new family tradition!


2 Comments

Chocolate Cardamom Cupcakes with Chocolate Buttercream Frosting

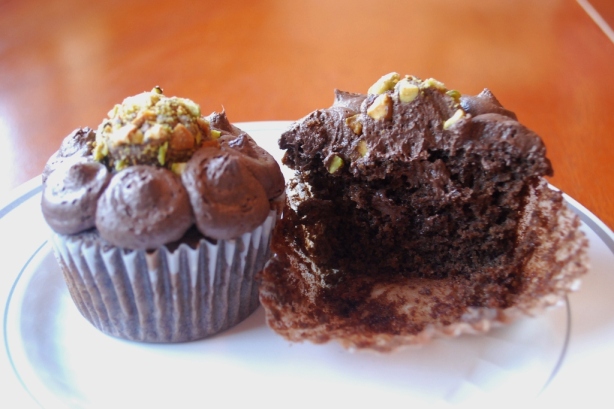
chocolate cardamom cupcakeI love spices and cardamom is one of my favorites.  The aroma of cardamom is so intoxicating!  One day I had a craving for cake and ice cream and made a microwave chocolate cake in a cup, throwing in a pinch of cardamom. YUM!

Today I wondered what a cupcake would taste like using the same flavor profile.  I sprinkled chopped pistachio nuts on frosted cupcakes.  DELISH!

Below is my recipe for Chocolate Cardamom Cupcakes with Chocolate Buttercream Frosting.  Click here for the PDF file.

ENJOY!

Cupcakes:

The batter yields between 9 – 12 cupcakes.

⅔ cup all-purpose flour

½ cup cake flour

2 tablespoon cocoa powder

½ teaspoon ground cardamom

½ teaspoon baking soda

½ teaspoon baking powder

¼ teaspoon salt

⅓ cup buttermilk

¼ cup orange juice

1 teaspoon McCormick orange peel

⅓ cup extra-virgin olive oil (fruity)

2 tablespoons butter (room temperature)

¾ cup sugar

1 egg

½ teaspoon orange extract

  • Preheat oven to 350°.  Position oven rack to the middle of the oven.
  • Put cupcake liners in cupcake baking pan.
  • Sift together flours, cocoa powder, cardamom, baking soda, baking powder, and salt in a bowl.  Set the flour mixture aside.
  • Mix together buttermilk, orange juice and orange peel in a cup.  Set the milk mixture aside.
  • Beat olive oil, butter, and sugar in a large mixing bowl on medium speed for 2 minutes.
  • Add egg and orange extract to the mixing bowl. Beat on medium speed for 2 minutes until smooth and silky looking.
  • Add ½ of the flour mixture and ½ of the milk mixture to the mixing bowl.  Beat on medium speed for 1 minute.  Scrape down the sides of the bowl.
  • Add remaining flour and milk mixtures to the mixing bowl.  Beat on medium speed for ½ minute. Remove beater(s) and scrape batter from beater(s) into mixing bowl.  Scrape down sides of the bowl.  Stir batter a few times with spatula to incorporate any streaks of flour.
  • Fill cupcake liners half full, which is a scant ¼ cup.
  • Bake for 20 minutes.  Remove from oven.
  • Let cupcakes sit for about 5 minutes then remove from pan.  Cool cupcakes completely before frosting them.

Chocolate Buttercream Frosting:

4 ounces of butter (room temperature)

2 tablespoon extra-virgin olive oil

½ teaspoon orange extract

1 ¼ cups of confectioner’s sugar

¼ cup of cocoa powder

1 teaspoon orange juice

  • Beat butter, olive oil and orange extract on medium speed for 1 minute.
  • Add confectioner’s sugar, cocoa powder and orange juice.  Start on low speed and beat for 1 minute until mixed well.  Scrape down sides of bowl.
  • Beat on high speed for 3 minutes until light and fluffy.
  • Frost cupcakes.


2 Comments

Monitor vs Actual: I Still Like the Color Combination

I love to see and touch my fabrics.  I love to experience firsthand the colors and the hand of the fabrics, get a sense of the drape and let my mind just go until it settles on a vision of the outfit/design.

A few years ago, I ordered fabric online for the first time.  It was a gigantic leap for me.  I am an ex-New Yorker spoiled by the abundance of independent fabric stores in Brooklyn, Manhattan and the Bronx.  I settled in Maryland and I had a hard time settling for the stores and selections available here.  While I appreciate my local Joann Fabric store, I like fine fabrics and that’s not why Joann exists.

Deciding to give online fabric shopping a try, a whole new world opened up.  I found a beautiful brocade in chartreuse yellow and beige online at Fabric Mart with coordinating wool/silk fabric in beige and in chartreuse yellow.  All the fabrics were from the same designer line, so I was confident the fabrics would work together.  I envisioned a brocade vest, beige pants and a chartreuse yellow ¾ length coat.  I ordered beige cotton for a shirt as well.

Well, when I received the fabrics I loved the brocade, but didn’t like the beige color of the wool/silk.  Although the wool/silk was from the same designer line of fabrics, the brocade was more taupe (cool tone) and the beige wool/silk fabric had warm tones.  My eyes and brain would not accept the pairing of these fabrics and that ended the coat, pant, vest ensemble.  A year later I cut the chartreuse yellow fabric and made a sleeveless lined dress combining the bodice from Simplicity 2648 and a self-drafted gore skirt.  I finished the hem of the dress with three rows of topstitching.  I always wore a sweater with the dress.

A few weeks ago I came across the beige fabric and decided to make a jacket. I like the combination of the beige and chartreuse yellow, and decided to make the jacket to coordinate with the dress made two years ago.  Each day I worked on the jacket (Simplicity 2446) for a couple of hours letting the design of the jacket evolved as I made it.  First, the under sleeves, collar and pocket flaps were cut from the chartreuse yellow.  I added inside patch pockets to the lining so I could carry my cell phone with me during a meeting.  One day I got the idea to add chartreuse yellow shoulder inserts before putting the sleeves in.  I didn’t want plain inserts and noticed the topstitching on the hem of the dress, so I topstitched the shoulder inserts and the pocket flaps.  The next day I thought about the collar and decided to topstitch that as well.  The next day, I thought about the under sleeves which were the only place on the jacket that the chartreuse yellow had not been topstitched and I knew I would not be happy leaving the under sleeves plain.  I removed the bottom button from the sleeve vents, topstitched just the under sleeve hems, and sewed the vent buttons back on.

Now that I was happy with the design of the jacket, the hem of the dress haunted my thoughts.  Why?  I had five rows of topstitching on the jacket and only three rows on the dress hem.  The stitching on the jacket was ¼” apart and the stitching on the dress hem was ⅜” apart.  I couldn’t just add two more rows of topstitching to the dress; no, no, noooo.  It’s the little details that bug me sometimes.  I removed the middle row of topstitching on the dress and added three rows of topstitching.  Now, I was happy because ALL the topstitching matched.

While the colors displayed on my monitor when I ordered the fabrics did not match exactly the colors of the fabrics I received, the color combination in the brocade inspired me.  I never would have combined beige with chartreuse yellow, but I like the color combination and I enjoy wearing the dress and jacket.


2 Comments

Please, No Old Looking Jeans

Him:  Where do you buy your jeans?

Me:  Why?

Him:  You need to buy some new ones.  All your jeans are starting to look old.

My husband can be brutally honest, even when no one has asked him for his opinion.  So today I made a pair of denim trousers.  I wanted a pair that would look good dressed up or down.

I brought the fabric about a month ago for the trousers.  The fabric is Sew Classic bottomweight- 4 oz dark wash denim fabric from my local Joann Fabric store.  The fabric for the pockets and waistband facings came from my stash.

I used Simplicity 2860 which is part of the Amazing Fit line of patterns.  I cut the front a size 14 and the back a size 16.  Since I wanted a close fit, I use the slim cut.  I redrew the center front line to be on the lengthwise grain and drafted on the fly extension.  I don’t like seams in the fly area; my abdomen is not flat and I don’t need any extra bulk in that area. I drafted the front pocket and fly facing as one piece.  I tapered the pattern in at knee area by ½” on the side and inseam seams for a slightly flared look.

I used navy blue thread for the topstitching since I wanted the look of dressy trousers and not jeans.  The inseam and crotch seams are welt seams with two rows of topstitching.  The side seams plain seams stitched twice for strength.  The hem, pocket edge and waistband have two rows of topstitching.

Daughter:  You didn’t put pockets on the back?

Me:  No.  I don’t care for pockets on my butt.  I don’t put anything in my back pockets.

Daughter turns around to show me that her phone is in her back pocket.  She’s funny.  She’s barely a size 2 and I am 45 pounds heavier than her.  Seriously, I am not putting my phone in a back pocket!

I did not make a muslin to test the fit before cutting the pants.  I like the fit, but I think I will tweak it a little on the next pair.  Husband likes the new pants, so I guess I am good for a while.


4 Comments

“Blank” Velvet Cupcakes and Cream Cheese Frosting

My daughter came home because she had an interview for an internship for the 2013 summer. Wow, time is flying. She stayed the weekend in order to fill up on home cooked meals. Home cooked meals must be part of college students’ DNA! My husband is the cook and I am the baker. I baked up a batch of Blank Velvet Cupcakes using red food coloring. I call them Blank Velvet Cupcakes because they can be made with any color or they can be made without food coloring. My cupcakes have a little bit of butter besides the vegetable oil because I love the taste of butter. I use a 50/50 mixture of natural and dutched cocoa because I like the rich flavor of the dutched cocoa but I don’t like the dulled color from using all dutched cocoa. I used pomegranate infused vinegar for this batch, but use what you have (white, apple cider…)

I hit the top of the frosted cupcakes with silver jimmies which seem to have a chocolate flavor in my opinion. I thought it made the cupcakes look very pretty.

DD: Why did you put sprinkles on the cupcakes?

Me: To make them look pretty.

DD: I hate sprinkles.

Me: Well, scrape them off your cupcakes.

I thought everyone loved sprinkles. LOL.

Below is my recipe for Blank Velvet Cupcakes with Cream Cheese Frosting. Click here for the PDF file.

ENJOY!

“Blank” Velvet Cupcakes with Cream Cheese Frosting

Pick your favorite color or leave the coloring out

Cupcakes:

The batter yields between 9 – 12 cupcakes.

¾ cup all-purpose flour

½ cup cake flour

½ teaspoon baking soda

½ teaspoon baking powder

¼ teaspoon salt

1 tablespoon cocoa powder

½ cup buttermilk

1 teaspoon vinegar

1 tablespoon food coloring (liquid) – optional

⅛ teaspoon food coloring (gel) – optional

2 tablespoons butter (room temperature)

⅓ cup vegetable oil

¾ cup sugar

1 egg

½ teaspoon vanilla extract

  • Preheat oven to 350°.  Position oven rack to the middle of the oven.
  • Put cupcake liners in cupcake baking pan.
  • Whisk together flours, baking soda, baking powder, salt and cocoa powder in a bowl, but not the mixing bowl for the batter.  Set the flour mixture aside.
  • Mix together buttermilk, vinegar, and food coloring in a cup.  Omit food coloring if you like.  Set the milk mixture aside.
  • Beat butter, vegetable oil and sugar in a large mixing bowl on medium speed for 2 minutes.
  • Add egg and vanilla extract to the mixing bowl. Beat on medium speed for 2 minutes until smooth and silky looking.
  • Add ½ of the flour mixture and ½ of the milk mixture to the mixing bowl.  Beat on medium speed for 1 minute.  Scrape down the sides of the bowl.
  • Add remaining flour and milk mixtures to the mixing bowl.  Beat on medium speed for ½ minute. Remove beater(s) and scrape batter from beater(s) into mixing bowl.  Scrape down sides of the bowl.  Stir batter a few times with spatula to incorporate any streaks of flour.
  • Fill cupcake liners half full, which is a scant ¼ cup.
  • Bake for 20 – 25 minutes.  Remove from oven.
  • Let cupcakes sit for about 5 minutes then remove from pan.  Cool cupcakes completely before frosting them.

Cream Cheese Frosting:

4 ounces of cream cheese (room temperature)

2 tablespoon butter cut into 6 – 8 pieces (cold)

1 teaspoon buttermilk

½ teaspoon vanilla extract

1 ½ cups of confectioner’s sugar

  • Beat cream cheese, butter, buttermilk and vanilla extract on medium speed for 1 minute.
  • Add confectioner’s sugar.  Start on low speed and beat for 1 minute until mixed well.  Scrape down sides of bowl.
  • Beat on high speed for 3 minutes until light and fluffy.
  • Frost cupcakes.


24 Comments

How to Make Shoulder Pads for a Jacket

I no longer buy pre-made shoulder pads.  The last pair I brought years ago consisted of expensive small wads that were not rounded like a shoulder.  When I make a jacket, I make a pair of shoulder pads using the jacket’s front and back pattern pieces.  I buy yards of fusible fleece when it’s on sale and use remnants of interfacing and cotton, so my pads are not expensive.  Customizing pads to accommodate fitting problems is easy.  A client has one shoulder that is higher than the other, so I make the left shoulder pad with 4 layers of fleece and the right shoulder pad with 8 layers of fleece, giving her a balanced appearance.

It takes me about 15 minutes to make a pair of shoulder pads.  Here’s a slideshow demonstration.

This slideshow requires JavaScript.